|
Visual Intercept Web 3.1 includes a new status promotion editor that greatly improves your ability to configure workflow for particular security groups as well as transitions between groups. The key difference between this and previous editors is that the new editor graphically displays all promotions for all groups.
As a result, this new promotion editor allows you to define and edit your promotion rules much more quickly, and visualize how the incident lifecycle is configured for the entire organization. This month's Tech Tip describes how to use the features of this new editor to create the most effective promotion rules with the least amount of effort.
What are Status Promotions?
In a typical organization, a number of different groups are responsible for making sure that Incidents are properly addressed before a product is released. Making sure that an incident has been addressed by all the relevant parties before being closed is a crucial aspect of any incident management system.
To help you maintain the integrity of the incident lifecycle, Visual Intercept allows you to create a status promotion model to enforce your organization’s development methodology. Once a status promotion model is in place, it enforces the order and type of status changes that can be made by members of each Visual Intercept Group. This will prevent, for example, a developer from changing an incident’s status directly from Investigation to Closed before the incident has been through the QA process. The status promotion rules function by limiting the status values available to users in each stage of the incident lifecycle. The status promotion editor is designed to allow you to visualize and build these rules in the same way you would draw a workflow diagram.
Basic Features of the Editor
The editor can be launched in the Visual Intercept Web administrative pages either from within a Group document or by selecting Tools | Promotion Editor from the menu bar. If you launch the editor from the Tools menu, it will open up in the all Groups View. However, before you start creating or editing promotions you might want to become familiar with some of the controls and features available in the new editor.
The Status Diagram Layout
When you first open the Promotion Editor all status values will appear in the view arranged in a default configuration. However, you can re-arrange the status values however you like, and update the model to save the changes. In this example I arranged and used the update button to save the layout, but only after I had enough of the promotions in place to know what final arrangement would look most intuitive.

The Toolbar
The items on the toolbar provide the means to navigate within the status diagram, arrange the elements of the diagram, and add and remove status promotions. The function of each toolbar item is described below.
|
Select Cursor
|
 |
When using pan or zoom, selecting this icon returns control to the cursor. |
|
Pan
|
 |
When selected, this tool allows you to "grab" the page to move to different areas. |
|
Zoom
|
 |
When selected, right clicking causes the page to zoom in, left clicking causes the page to zoom out. |
|
Add Promotion
|
 |
Selecting this icon and drawing a line between status boxes adds the Promotion to the currently selected group. |
|
Allow Promotion
|
 |
Selecting a line and clicking this icon allows the currently selected group to make the status change. |
|
Deny Promotion
|
 |
Selecting a line and clicking this icon removes the ability of the currently selected group to make the status change. |
|
Allow Entry
|
 |
Selecting a status box and clicking this icon allows the currently viewed group to enter an incident in this status. |
|
Deny Entry
|
 |
Selecting a status box and clicking this icon denies the currently viewed group the ability to enter an incident in this status. |
|
Refresh
|
 |
Retrieves the last saved promotion diagram from the database. |
|
Update
|
 |
Commits changes to the database.
|
Color Coding
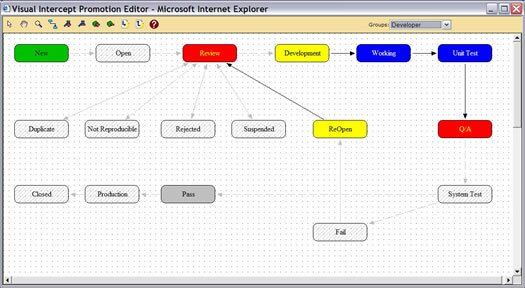
The color coding of the elements in the status diagram indicate how a particular group can promote an incident to or from a particular status. By understanding the meaning of the codes, you can very quickly determine if a set of promotions you have created has the desired effect. The yellow code for a re-entry status is an excellent example. If a status shows up as yellow in a particular diagram, that implies that an incident can be set to that status by a member of at least one other group and promoted from that status by the current group. Knowing that the status of “Development” is a re-entry status for the Developer group is important if you want to ensure that Developers can only begin to change the status of an incident once it has been placed in a status of development by a member of another group. The meaning of each of the color codes is described below.
| Status Color |
Description |
|
|
Indicates that this status is not available for the current group. |
|
|
Indicates the status is available as an entry status for the current group. |
|
|
Indicates that further promotions are available for the current group. |
|
|
Indicates that this status is available as re-entry for the current group. This means that members of the group will modify the incident at some point during its lifecycle after it is promoted by another group. An example of this would be a situation where the Quality Assurance group may not have the ability to promote the incident until it is moved to the "QA" status by another group. |
|
|
Indicates that this is a terminal status and no further promotions are available for the group from this status. |
Setting Promotions for Specific Groups
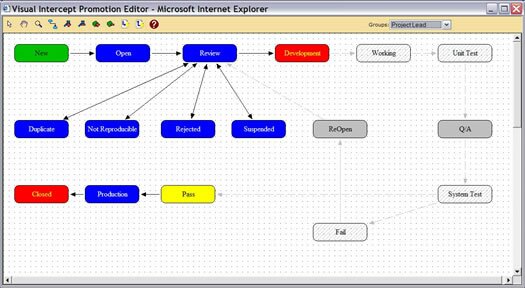
To set promotions for a specific group, use the groups drop-down to select the group you wish to configure. When you select a particular group the promotions available to that group will be set to bold and the status values will be color coded accordingly. Promotions that are allowed for groups other than the one you have selected will appear disabled, i.e., grey. To create a new promotion, click the Add Promotion button, drag between the two status values you want to add the promotion for, and double-click to add the promotion. To allow a promotion for a group that is currently allowed to another group, select the grey disabled promotion and click the Allow Promotion button.
Note that the Add Promotion tool does set the to and the from relationship based on the direction in which you drag and drop. If you want to the relationship to be bi-directional, you simply drag and drop the relationship in both directions.
The screenshots below illustrate how the view changes by selecting the Project Lead group, and then the Developer group. By allowing different group promotions to be laid over the same status diagram, the status promotion editor allows you to focus on the available promotions for a specific group, and easily compare promotion rules between groups. This ability to easily compare where promotion rules transition and overlap between groups is key to configuring rule that incorporates the entire lifecycle.


The [All Groups] View
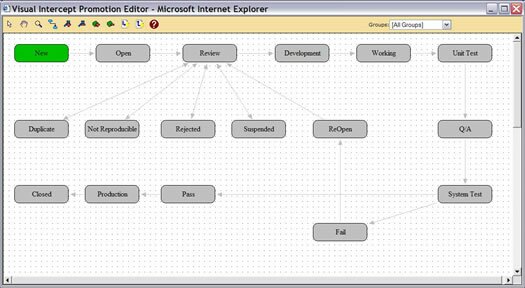
The [All Groups] view displays all of the status values and all of the promotions available to all Groups. In addition, the [All Groups] view will color code a status for a particular property if that status has that property for all Groups. We will learn more about these properties later. However, in this example, the status New is green because green indicates an entry status and New is an entry status for all Groups. In this sense, the [All Groups] view acts as a summary view of the status promotions and status properties that are true for all Groups. So, the [All Groups] view is useful when you want to ensure that a particular status promotion or status property is true for all groups.
You can also use the all [All Groups] view to allow promotions for all groups in a single action. For example, if you wanted to allow members of all of your groups to be able to create incidents with a status of New you can select the status New In the [All Groups] view and click the Allow Entry button on the toolbar.

Some Tricks for Arranging Elements in the Diagram.
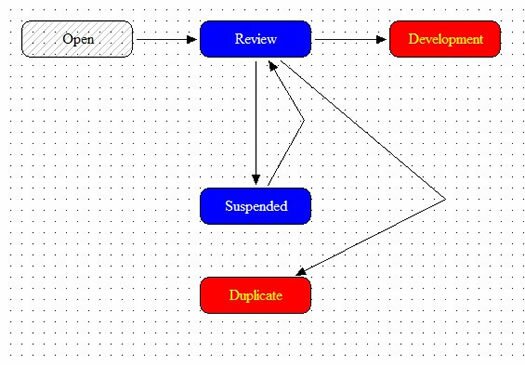
Two features of the promotion editor you may overlook is the ability to split overlapping lines apart and the ability to add vertices to lines for promotion rules. To split overlapping promotion lines apart hold down the CTRL key and click on the line. This will produce a cursor that will allow you to pull the lines apart. To add vertices to a promotion line, left-click while you drag the promotion line. To remove a vertex from a promotion line, hold down the CTRL key and click on the vertex you want to remove. A cursor will appear that will allow you to remove the vertex from the promotion line. These features of the editor provide you with more options when you want to arrange the elements of your promotion diagram for maximum clarity. The screenshot below illustrates the use of each of these features.

|
