|
Tech Tip: Changing the Location of Custom Fields in Visual Intercept Web 3.0
In addition to allowing custom fields to be placed on an separate tab, Visual Intercept Web 3.0 allows you to place custom fields on the document header where they are always visible. Placing custom fields in the document header is particularly useful when you have a small number of custom fields that don't require a separate tab. However, in order to use this feature most effectively, you will need to choose how you would like to position these fields. This month's tech tip describes how you can use Visual Intercept Web's style sheets to achieve total control over custom field layouts.
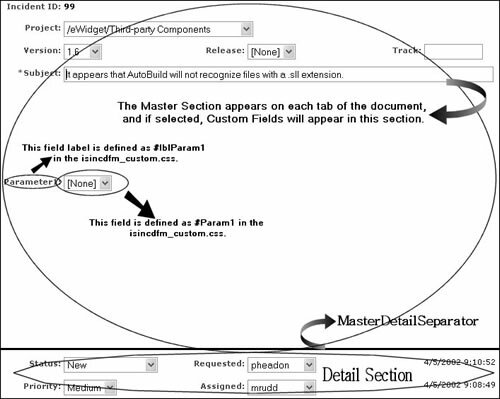
When adding custom field(s) that are displayed on all tabs, there may be large areas of unused space between fields. This space may appear between both the space allocated for the placement of custom fields on the Master Section of the page (which contains information that is displayed on each tab) and the space allocated for the Details Section of page (which contains information unique to each tab). The black horizontal line serves as the separator between the Master Section and the Details Section. When adding custom fields you may wish to edit the appropriate style sheet to adjust the Details Section relative to the Master Section, and the placement of the custom field within the Master Section portion.

The image above is a Visual Intercept Incident document, which has the Parameter1 custom field added to all tabs of the Incident document. The layout and appearance of each field is defined using elements of the Cascading Style Sheet (CSS) for the applicable document type. This technical note will demonstrate the steps necessary to edit the appropriate CSS to position the custom fields, the custom field labels, and the Details Section of the document to eliminate unused space.
These steps will involve editing three values in the iwincdfm_custom CSS, then applying these changes to the CSS. The changes that will be made are as follows:
- Edit the value of the Parameter1 label to move it to the top of the Custom Field section.
- Edit the value of the field "Parameter1" to properly align it to the right of the Parameter1 label, directly underneath the "Subject" field.
- Move the Details section of the page up to a position directly below the Master section.For purposes of this technical note, the incident document and its associated CSS will be used as an example. The CSS's for the remaining Visual Intercept document types are similar in design.
The style sheets are located in the Stylesheets subdirectory of VIWeb or VIWebdev in Inetpub/wwwroot. The table on the next page lists the CSS associated with each document type when the custom fields are added to all fields:
Document Type
|
Associated CSS when Custom Fields are added to all tabs |
| Incident |
iwincdfm_custom.css |
| Project |
iwprojfm_custom.css |
| Hardware |
iwhdwrfm_custom.css
|
| Contact |
iwcontfm_custom.css |
| Account |
iwacctfm_custom.css |
Positioning Custom Fields
Before editing the CSS, you should first save a copy of the original CSS by renaming the file. You will then edit the original file. This will allow you to return to the original CSS if you are not satisfied with your initial results.
As a general rule, changes to the style sheet should be made when users are not accessing the Visual Intercept Web site. You can easily view the changes you are making by opening a Visual Intercept Web session and opening the document type you are editing. As you save changes to the Style Sheet, clicking Refresh on your web browser will display the changes you have made.
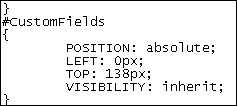
Custom fields (ie: #Param1) and their labels (ie: #lblParam1) are embedded within the #CustomFields element of the CSS and are independent of one another. In each style sheet, the #CustomField section is positioned so that it begins directly below the last standard field contained in the Master Section.


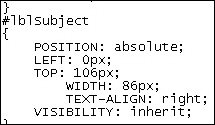
The above image shows that the TOP value of the #lblSubject is 106px and the #CustomFields section TOP value is 138px. This means that embedded #CustomFields element begins 32px below the "Subject" field label.
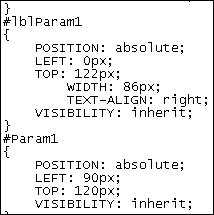
It is important to keep in mind that custom fields are embedded within the #CustomFields element of the style sheet. This means that the value of any elements contained in the #CustomFields section are in relation to only the #CustomField section of the CSS, which has its own pre-defined value. In the image below, the TOP value of the #labParam1 is 122px. from the beginning to the #CustomFields element.

Positioning the Details Section:
The #DetailSection refers to the section of the document that is unique to each tab. The TOP value defines the beginning of this section of the page, in this example 517px. When all custom fields are not enabled, there may be a large space between the header section and the details section, as illustrated by the first image.
This space is made apparent by the display of a black horizontal line separating the Master and Details sections. The #MasterDetailSeparator element controls the visibility of this line. Keeping this line visible when making adjustments to the style sheet is recommended, as it will provide a visible reference to the position of the details section in relation to the Master section.
- Open the appropriate CSS.(In this example, iwincd_custom)
- Edit the TOP value of the #DetailSection to an appropriate value. In this example #DetailSection was moved to 180px.
- (Optional) Hide the #MasterDetailSeparator by replacing the value inherit with hidden.
- Save the changes to the file. You can easily view the changes you are making by opening a Visual Intercept Web session and opening the document type you are editing. As you save changes to the Style Sheet, clicking Refresh on your web browser will display the changes you have made.
The result of the above steps is displayed below:

If you have other questions about issues not included in or beyond the scope of this Tech Tip, please contact Elsinore technical Support Services at or 866.866.0034 option 2.
|
