
 |
|
|
Elsinore Visual Intercept |
|
Incident Management System
For Windows® 95, Windows NT" 3.51, NT" 4.0, and Microsoft® Windows 3.x
Contents
The Elsinore Technologiesí Visual Intercept Getting Started Guide contains an overview of incident management, and hints for quickly installing and exploring the Visual Intercept® Incident Management System.
The Getting Started Guide is intended to supplement the Visual Intercept User's Guide. For more detailed information on how to use or install Visual Intercept, please refer to the User's Guide.
If you are like most people who are just starting to learn about Visual Intercept, you probably have two goals in mind:
First, you want to get some idea of what the product does and what using it will be like.
Second, you want to be able to install it on your computer quickly and check out the key features of the program without too much fuss.
The Getting Started Guide will help you with both of these goals.
Chapter 1, An Introduction to Incident Management, will give you a clear impression of what Visual Intercept can do for you and your software development process. You'll get an overview of what incident management is, and see a hypothetical business using Visual Intercept to track a particular bug through the development process.
Chapter 2, Quick Installation and Evaluation of Visual Intercept, is a guide for quickly and efficiently loading the Visual Intercept Software onto your computer for evaluation. The chapter contains step-by-step instructions for installing Visual Intercept on an individual machine or on a network. The instructions guide you past some of the subtle pitfalls involved in setting up an ODBC data source, and show you how to use the Visual Intercept Wizard to start setting up your own projects in the system. This chapter also helps you configure some of the key features of the system, such as integration to Visual SourceSafe, so you can try them out immediately.
If you have a question about Elsinore Technologies' Visual Intercept, first look in the Visual Intercept User's Guide. On-line help is also available by clicking F1 or the Help button on the Menu bar. You can also find the latest updates and technical information in the readme.txt and install.wri files that came with your Visual Intercept diskettes.
No-charge support from Elsinore support engineers is available via a toll call between 9:00 A.M. and 4:00 P.M. Central Time, Monday through Friday excluding holidays. This support is available for all registered owners of Visual Intercept products.
When you call, you should be at your computer and have the appropriate Visual Intercept documentation at hand. Please be prepared to give the following information:
| Phone: | (713) 956-1221 |
| Fax: | (713) 956-0889 |
| Email: | [email protected] |
| Web: | elsitech.com |
The big day is at hand: after months of work, your software product is finally being released. Confetti litters the floor outside your office, and down the hall you hear champagne bottles popping. Everyone is relieved and happy. Hundreds of copies have already shipped, and what started as just a dream has finally become a reality.
You brush the confetti off your keyboard and start up the 1.0 version, just to see the splash screen again and savor the victory. You cruise through the features, fiddling with the settings, thinking back on all the glitches and problems you worked through to make this happy day come about.
Then, out of nowhere, like a brick between your eyes, comes an unthinkable sight: an error message on your screen. Oh no, you think. It can't be true. That problem with the system integration you found months ago is still there, right there before your eyes in the released product. How could it have gotten through? It can't be true . . . you just released your product with a major bug.
Your happy victory thoughts are shattered, replaced by a slow, sinking sensation in the pit of your stomach. All you can think about now is the wave of tech support calls that will hit on Monday, and what will happen when your boss finds out . . .
Surely, you think, there must have been a way you could have avoided this. Isn't there some way we can keep things from slipping through the cracks?
It's a nightmare situation everyone dreadsó one of the hundreds of bugs that turned up in your software comes back to haunt you.
This scenario has happened often enough that people began to look for ways to avoid it. Thus, incident management was born.
The software industry has a multitude of phrases for the process of keeping track of software glitches: bug-tracking, defect management, problem-tracking, configuration management, etc.
After much thought, Elsinore Technologies, Inc. decided to call Visual Intercept an "incident management system." We use the word "incident" rather than "bug" or "defect," because it is a broader and more flexible word, encompassing a number of different events that might affect software development. Elsinore recognizes that a development team must track more than just bugs ó one must also consider feature requests, customer complaints, production deadlines, vendor limitations, and a host of other issues.
This flexible, open-ended approach allows the Visual Intercept user to make the most of the product, communicating everything that matters to everyone that matters.
When a group of people work together on a project over a long period of time, a multitude of problems arise. The array of problems that can arise in developing software is so broad and overwhelming that no one person can keep track of everything. Development teams thus need a systematic way to control the process of finding and fixing bugs and other problems. Incident management software such as Visual Intercept is designed to make the job of tracking problems as streamlined and efficient as possible, so development teams can spend their time solving problems instead of trying to remember all the problems that need fixing.
Whether you are a large team of 50 developers or a small three-man shop, the basic process of tracking incidents is usually the same:
Every development team must go through these four steps in the process of building software. Many teams do it "on the fly," trusting that individual energy and attention will ultimately solve all problems that arise. Other (much wiser) teams try to do it systematically, using formal procedures for capturing and routing information. Such systems vary tremendously in their complexity and sophistication: ring-binders full of forms, post-it notes on someone's chair, email systems, centralized databases, etc.
Most people who use such systems nonetheless find them to be very cumbersome. Filling out paper forms, printing out screen shots of error messages, carrying reports to co-workers down the hall, leaving notes on someone's computer screen, all take time and disrupt the regular flow of work.
Visual Intercept automates each of the four basic steps in incident management. Using Visual Intercept, a developer can record all information related to an incident, forward it to the right people, check up on the incident later on, and even analyze the pattern of incidents occurring, all without leaving his or her desk.
The following narrative is given as an example of how a software development team might use Visual Intercept in the course of their daily routine.
This example is by no means meant to be prescriptive. Every group of developers will have their own organization and their own ways of dividing tasks involved with development. A large corporate development team usually divides the development process into several distinct job categories: programmers, testers, Q/A technicians, tech support, documentation writers, and project managers, to name a few. In a small team of programmers, the job descriptions may be less defined, with everybody participating in every aspect of software development.
This story will give you a taste of how Visual Intercept's features can be used, and give you ideas for how you might use it in your own organization. Words in bold indicate particular features or commands in Visual Intercept.
XYZ Corporation is a highly successful consulting firm that builds custom software for a number of big corporate clients. With 30 employees, XYZ is growing quickly and has more business than it can comfortably handle.
Early one morning, Miss Susan TechSupport gets a call from an irate customer, Joe Shlabotnik of CFK, Inc. He is ticked off because the latest upgrade of XYZ Wizzbang is not integrating with Microsoft Word. Susan listens to Mr. Shlabotnik's problem, and realizes that this is probably a bug that needs addressing. She doesn't remember this bug being reported before, but she decides to check the Visual Intercept database to see if someone else has ever run across this bug.
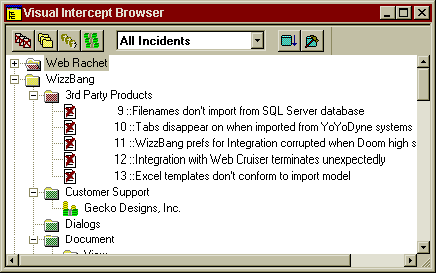
She pulls up her Visual Intercept Manager program, which she keeps running in the background most of the time. Using the Browser, she looks inside the Project labeled WizzBang, and then in the subproject Third-Party Products. A few incidents have been recorded in this subproject, but based on the descriptions none of them seem to be related to Microsoft Word.
Susan reassures Mr. Shlabotnik, and tells him that XYZ Corp. will look into his problem immediately. She creates a new Incident document in Visual Intercept, and then asks Mr. Shlabotnik specific questions about the bug. As Mr. Shlabotnik tells her about the problem, she records all the information into the Description field of the Incident.
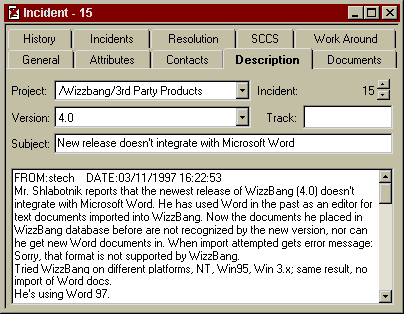
She then clicks on the Fetch All Contacts icon, to see if Mr. Shlabotnik had ever reported a bug before. She finds that he has called the tech support desk before.
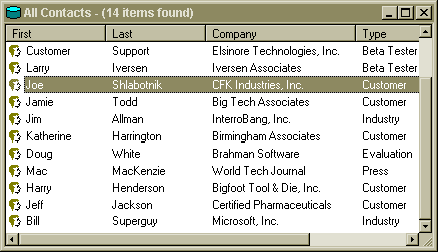
She double-clicks on his listing, pulling up a window with his full name, title, address and phone numbers. She double-checks all this information with him, and finds that while most of the information is correct, his phone number has changed. She corrects the Contact information, and tells Mr. Shlabotnik that she'll call him back as soon as she knows what's wrong.
Now that she's off the phone, Susan takes a moment to fill in the rest of the information. She sets the Priority to High, since this is not a complete show-stopper for Mr. Shlabotnik but obviously something he needs very much. Susan sets the Severity to Unexpected, since he did expect the Wizzbang to behave like its previous versions. She sets the Requested field to her own UserID, stech, so others know that she received the call and registered the Incident. She doesn't mess with the Assigned tag, since she's not quite sure who should handle this problem.
Having filled in the General information fields, she clicks on the Contacts tab. She clicks the Attach button, and adds Joe Shlabotnik to the list of Contacts associated with this Incident.
Now, having gathered all the information she can, Susan inserts the Incident document into the database. Now all the information is available for other Visual Intercept users to see. She reduces Visual Intercept to the background, and goes back to taking support calls.
Susan's incident was inserted into the Third Party Products folder of the Wizzbang project. Now the information is automatically routed to the Project Lead responsible for third-party interfaces, Bob Manager. Mr. Manager is working on a budget report when his Visual Intercept program beeps at him, and a Notification Window pops up.

Bob checks the Notification, and finds the Incident document which Susan has filed.
Bob and his team of programmers is responsible for third party product issues, and when he reads the incident description, he realizes he has a major bug on his hands. Bob notices that the bug report comes from CFK Industries, one of biggest companies using WizzBang, so he knows this problem should get a very high priority. He immediately changes the Priority from High to Urgent, and changes the Status from New to Investigation, to indicate that he has started to look into the matter. He starts up his own copy of Wizzbang, and tries to recreate the bug that was reported. Sure enough, he gets the same error message Mr. Shlabotnik had reported. Bob takes a screen shot of the error message and Attaches the bitmap document to the Incident.
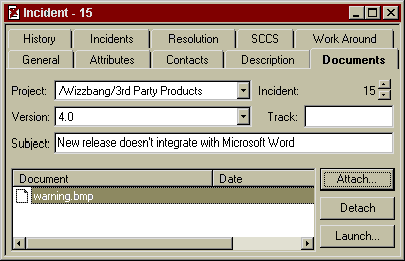
He then adds his own comments to the description window, telling how he recreated the bug. His comments are stamped with his userID, date and time, so they are kept separate from Susan's original description of the problem.
Bob decides to assign this problem to his best developer, Joe Programmer. Bob sets the Assigned User to jprogr, so Joe knows that he has been assigned the task. He also resets the Requested field to his own userID, Bmanage, so Joe knows it was his boss who is making the request. Bob then uses the Send command, to automatically email a copy of the incident document to Joe as well, since Joe might not have Visual Intercept running at the moment, but he does usually check his mail regularly. Bob adds his own comments to the email: "Joe, get on this right away! It's a real bug!" Bob then goes back to working on his budget report, hoping that Joe will be able to solve the problem quickly.
Joe checks his email by mid-morning, and finds the message from his boss Bob. Joe fires up his Visual Intercept program, and pulls up the Incident to read all the detailed comments. Joe has been working on a number of minor bugs lately, but he immediately sees that this is more important. He sees that Bob already recreated the bug, and he double-clicks on the attached bitmap to see the screenshot. Joe is really glad Bob included that screenshot ó it told him exactly what he needed to know. Joe goes to the SCCS tab of the Incident and clicks Attach, so he can go directly to the Visual SourceSafe version control system to find the source code he needs to work on.

Joe attaches the source files to the incident, and then clicks Checkout to have the documents automatically checked out to his working directory. He looks at the code, and after half an hour finds the probable cause of the problem. Joe resets the Status of the Incident to Development, so Joe and Susan know that he's found the problem and started working on it. He makes a few quick notes in the Description field, explaining what caused the failure and what he'll try to do to fix it.
Meanwhile, Susan Tech-Support has not forgotten about the incident. She would like to call Mr. Shlabotnik back before noon so she can reassure him that they're working on it. She looks in on the Incident report, and sees that Bob and Joe have already gotten on it. She reads Joe's comments, and is pleased to hear that Joe thinks he can repair it today. Susan calls Mr. Shlabotnik back, and tells him that his bug is already been tracked down and that a fix is in the works. Mr. Shlabotnik is incredibly impressed that XYZ got back to him the same day, and he thanks Susan for the call.
Back in development lab, Joe hacks away at the code. He reworks a critical routine and, impressed with his own brilliance, declares the bug to be fixed. He changes the incident's Status to Q/A, sets the assigned user to wqual (Walter Quality), and updates the changes to the incident to the database. He then goes back to playing video games.
Walter Quality, a scrupulous quality assurance officer, frequently checks the Visual Intercept database to see if any incidents need his attention. He does this by using a pre-set Query called QA Incidents, which searches the database for any incidents that have recently been promoted to Q/A status. That afternoon, Walter sees the Wizzbang incident when he runs the query. Walter reads the Incident Description carefully, and even recreates the bug occurrence just to satisfy himself that he knows what he's up against. He then takes the repaired code modules that Joe attached to the incident, rebuilds the application, and tests it to see if the fix worked. Lo and behold, Joe's work fails the test ó the bug is still present, and Wizzbang 4.0 still doesn't integrate to Microsoft Word. Walter curses silently; this is just like Joe, to send a bug-fix along without testing it first. Walter appends his comments to the Incident Description, sets the Assigned field back to jprogr, and sends the Incident back to Joe.
Joe is mortified when his Visual Intercept program beeps at him again late that afternoon. He was sure he had fixed the bug, but looking at the incident he sees that Walter flunked his fix. Joe calls one of his friends at Microsoft, Bill Superguy, and asks for advice on the problem. Bill emails Joe some helpful hints on integration to Word, and Joe attaches that document to the incident, and also adds Bill to list of Contacts associated with the incident. With renewed confidence, Joe tears into the code again, and a few hours later emerges with a fix that works. He tests it this time, just to be sure, before he sends it on to Walter again.
Walter checks for Q/A incidents again first thing the next morning, and after retesting the code he approves Joe's fix. Walter then sets the incident Status to one of XYZ's custom-defined Status values, called Distribute. This means the company is now in the process of getting the bug fix out to the customers. Walter emails Bob Manager, and lets him know that he can proceed.
When Bob looks at the incident again, he can see all the work that went into the bug-fix clearly documented. He reviews the History tab in the incident, pleased to see that everyone responded so quickly when the bug came in.
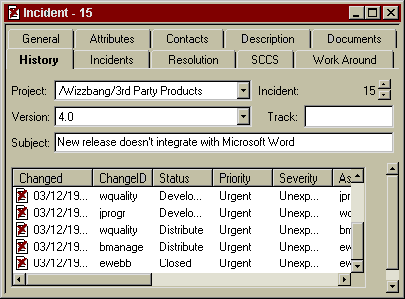
In fact, he was even thinking of putting this and other incidents in his budget proposal; by demonstrating how quickly his team responds to Urgent- and High-Priority bugs, Bob can impress the president of XYZ and justify the extra money spent on salaries.
Bob does note with mild disapproval that Joe's first bug-fix was sent back by Q/A. Bob seems to remember that Joe does that a lot, always sending code along before he's tested it. Just to check, Bob clicks on the Query Builder, to search the Visual Intercept database for very particular incidents. He requests all incidents in Joe's projects that were inserted within the past month.

The request pulls up five incidents, and sure enough, four of the five incidents involved Q/A sending the code back to Joe for more work. Bob sends Joe a brief email, praising him for his good work on the bug, but reminding him firmly to check his fixes more thoroughly in future.
Bob assigns the incident to Elvira Webb, the company's web master, to take care of putting the bug-fix up on the Web so customers can down-load the corrected software. Elvira puts together a spiffy-looking HTML page, informing the customers of the problem and how they can get the new, corrected version: WizzBang 4.0.1. Once customers are successfully downloading the corrections, Elvira sets the incident Status to Closed. She writes up a final summation of the bug-fix distribution in the Resolution field of the incident, so that if others called in with the problem Susan would be able to direct them to appropriate solution.
Susan, meanwhile, is still busy dealing with the bug. Other customers also called in with reports of the same bug. She recorded the details of each report faithfully, but set the Status to Duplicate so everyone would know it was a bug they'd already seen before. After reviewing each duplicate incident to be sure they were all the same thing, Bob Manager would attach the Incident documents to the original bug report. That way, once the bug was fixed, they could easily find all the duplicate incidents, and inform everyone who reported it that a fix was ready.
Our story took us through the complete process of finding and repairing a single bug. Any software company would go through a similar procedure to fix a bug. What makes XYZ's story so remarkable is that by using Visual Intercept:
Thus, Visual Intercept allows you to gather and use incredibly valuable information without hindering your productivity. If fact, the system improves productivity by automating the process of routing incident information to those who need it.
Now that you've gotten a sense of what Visual Intercept Incident Management System can do for you, you're probably eager to install the software on your computer.
However, there are a few tricky steps involved in getting the Visual Intercept System working. Even once the programs are loaded on your computer, one must still hook the programs up to an ODBC data source.
If you are still evaluating Visual Intercept and are primarily interested in getting started quickly, we suggest you use the procedure for Quick Installation below. This procedure will automatically install a Microsoft Access database for Visual Intercept to use as its data source. That way, you won't have to deal with your system's ODBC interface to select a data source. You will be able to run Visual Intercept on a single computer and evaluate it. The Quick Installation will also show you how to use the Visual Intercept Wizard to immediately set up a sample project.
When you evaluate Visual Intercept, you will probably want to try out one of the system's most powerful features: integration with Visual SourceSafe". This chapter also contains instructions for Setting Up Visual SourceSafe" Integration, starting on page 18.
After you have evaluated Visual Intercept on a single computer and tried out its features, you will eventually need to install it on your network server and on each client computer. Follow the directions for Network Installation, starting on page 22, when you are ready to put Visual Intercept on your network.
For more in-depth discussion of installation and ODBC data sources, please refer to Chapter 1 of the User's Guide, "Installation."
Start by checking your system requirements. Elsinore Visual Intercept runs on the following operating systems:
The Quick Installation of Visual Intercept requires 10 MB of hard disk space.
If you are using a 16-bit operating system (i.e., Windows 3.x), the Visual Intercept Setup program will prompt you to install the Win32s v1.30 (or higher) subsystem. The Win32s subsystem allows applications developed for 32-bit operating systems to run under Windows 3.x. Win32s 1.30 is available through Microsoft or Elsinore Technologies, Inc.
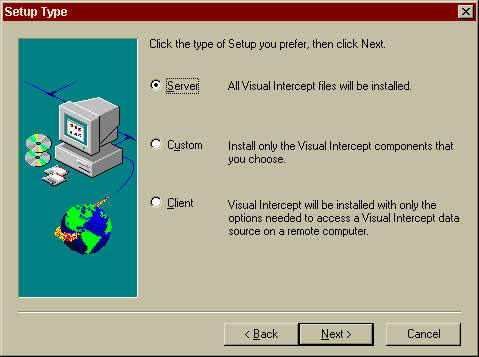
Once the installation procedure is completed, you will be prompted to launch the Intercept Wizard to build your project hierarchy. Go ahead and click the Wizard button.
The Wizard will list a few options for setting up project hierarchies in your Visual Intercept database:
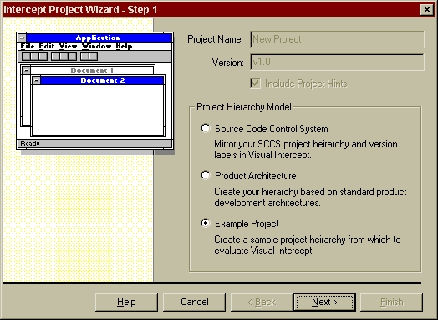
To import the Example project into your data source.
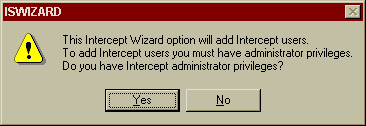
This is just a security feature built into the Wizard. If you are installing Visual Intercept for the first time, just click Yes.
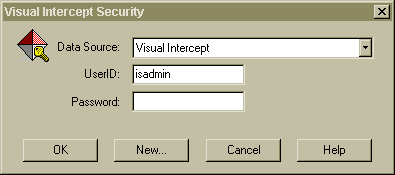
Note: If you select the Access database, the Data Source will show, "Visual Intercept - MS Access."
Once the wizard has copied the Example project hierarchy into the appropriate data source, you are ready to launch the Visual Intercept Manager and begin working with Visual Intercept.
To launch the Manager
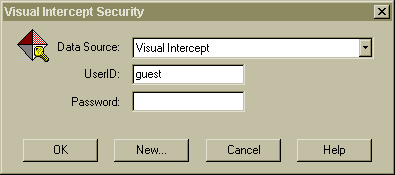
If you are currently using Visual SourceSafe for your source code control system (SCCS), then you'll definitely want to set up the Visual Intercept integration to Visual SourceSafe.
Setting Source Code Control System preferences.


For more information on attaching source code to incident documents, please refer to Chapter 4, "Incidents," of the User's Guide.
Another important aspect of Visual Intercept's integration to Visual SourceSafe is the ability to import Visual SourceSafe project trees into the Visual Intercept project tree. This allows you to coordinate your version control and your bug-tracking hierarchies.
To import your Visual SourceSafe tree into Visual Intercept, refer to Chapter 2, Wizard, in the User's Guide.
Speedy retrieval of data is very important for an incident management system to be useful and effective. Certain settings in the Visual Intercept Preferences can have a profound impact on the speed of data retrieval. You might want to experiment with these Preference settings now, so you can see Visual Intercept working at its fastest.
From the menu bar, click Edit and then click Preferences.
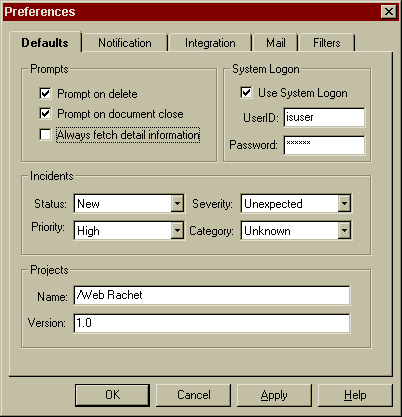

For more information on using Filters, please refer to the, Working in Visual Intercept chapter of the User's Guide.
Visual Intercept is normally used in a network environment, with a data source located on a Windows NT Server and many client computers running the Visual Intercept application.
By far the easiest way to create a network installation of Visual Intercept is to use the Microsoft Access database included with the software.
If your organization uses SQL Server or Oracle as its database management system, and you wish to use that database system for Visual Intercept, you will first have to create the databases using scripts. Please refer to the Installation and System Administration chapters (chapters 1 and 9 repsectively) of the User's Guide.
Install the Visual Intercept program to the Windows NT Server first. This installation can be done exactly like the Quick Installation described earlier in this guide.
Install the Visual Intercept program on each of the client computers. The client installations can be done using the netsetup.exe created during the Server installation. The netsetup.exe will install Visual Intercept using most of the settings defined during the original installation.
The netsetup.exe is located in the primary installation directory on the server machine.
Note: You can find additional information in the install.wri and readme.txt files located in the primary installation directory, the User's Guide, and the Installation prompts during the setup procedure.
© 1996, 1997 Elsinore Technologies, Incorporated. All rights reserved.
Information in this document is subject to change without notice. Companies, names, and data used in examples herein are fictitious unless otherwise noted. No part of this document may be reproduced or transmitted, by any means, electronic or mechanical, for any purpose, without the expressed written permission of Elsinore Technologies, Inc.
Elsinore and Visual Intercept are either registered trademarks or trademarks of Elsinore Technologies in the USA and other countries.
Microsoft is a registered trademark of Microsoft Corporation.
MS Access is a registered trademark of Microsoft Corporation.
SQL and SQL Server are registered trademarks of Microsoft Corporation.
Oracle is a registered trademark of Oracle Corporation.